

When this Land Rover Defender 90 arrived at Wildworx HQ we already knew what we wanted to achieve.
The Heritage Defender had been loved and well used by its one previous owner. The Keswick Green colour, meant we knew the restoration project needed to have a modern twist on a heritage feel. The build included:
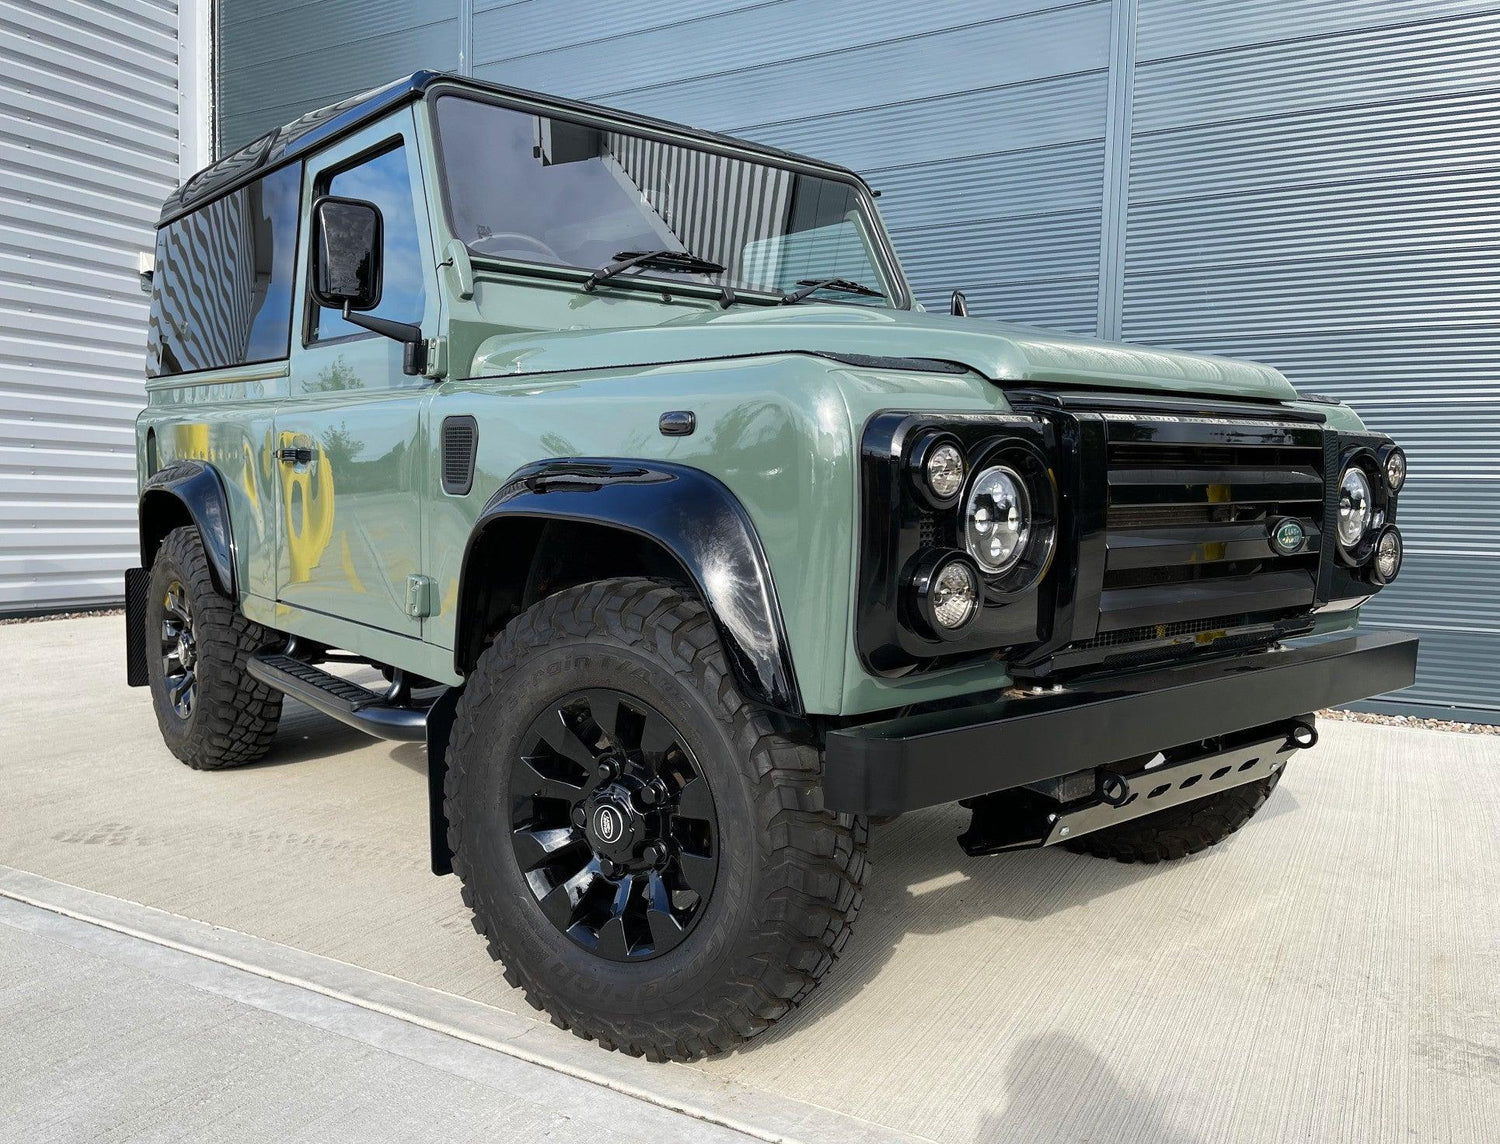
- Keswick Green with Gloss black roof respray
- Fully soundproofed and insulated using Dodo Peacemat
- Panoramic tinted glass upgrade
- Tinted roof lights
- A lux Alcantara Suede lining has been added to the headlining, door panels, custom built interior panels and added trims
- 16” Sawtooth Alloy Wheels with the classic BF Goodrich tyres
- New front grill facelift
- XL Smoked lens kit front and rear
- Halo headlights
- Interior LED upgrade
- Dynamic smoked side repeaters
- 6mm Steering guard
- Gloss Black Wheel Arches
- Black Side Steps
- Mud Flaps
- Tread plate wing tops
- Black leather, heated sport seats
- 2 Bench seats in rear
- Sustainable and water resistant Iroko (teak) flooring
- L-track cargo tie down system
- Iroko bulkhead rail and rear door handle detail
- Hidden LED strip mood lighting
- USB charger in cab
- Light Switch, USB and charging socket in rear
- Tow bar

STRIP BACK
Defender restoration projects always start the same way. We remove everything, from the dash to the floor panels and the front seats. Once you get it stripped back, you're able to fully see what you're working with. As we undo the nuts and bolts, the mud pile builds on the floor of the workshop and we can finally start the rebuild.
The plan was to start from the ground up. Checking the chassis, disc braked rear axle and the replacement of any worn or damaged parts. This will help us fully rebuild the vehicle like new. These vehicles are now such a great investment, this is the only way to ensure the vehicle is around for generations to come.

BODYWORK
The great thing about these heritage Land Rover Defenders is they come apart like a kids toy. As you unscrew the bolts you’re left with what looks like a flat pack Defender. Each of these individual components were sent over to the local bodyshop.
They each underwent a full respray in that popular Keswick Green colour. Making each of the panels look brand new. There were a few panels that needed replacing. Including the rear quarter panel and two front wing sides.
Taking it apart and putting it together is a fairly easy process. All panel work is riveted or bolted together so nothing needs cutting. Because the body panels are aluminium you won't get rusting, however you do on the steel sections of the vehicle, like the chassis. We treat light corrosion and replace anything serious.
SOUNDPROOFING AND LINING
For anyone that has driven a Land Rover Defender, they know how noisy they can be. We wanted to improve on the ride quality. We used the popular DoDo Mat Sound Deadening which helps reduce road and engine noise. We use the same product in our Campervan Conversions for it's absolutely fantastic quality.
Rather than using our 4 way stretch carpet, we wanted to give this rugged vehicle a more luxurious feel. We chose to use Alcantara fabric. It has a soft suede-like feel, and is really durable.
PANORAMIC WINDOWS
Since we'd added seats in the back of the Defender we wanted to install panoramic windows. They have a 90% tint which means they look almost black from the outside. Giving a real sleek look. Here's how to fit them.
The sides of the Land Rover are made of aluminium sheeting. You need to draw the cut out for the window onto the outside of the vehicle (the diagram is supplied with the window kit). Mask up the side of the van. Drill a hole on the inside of the mark large enough to fit the metal jigsaw blade. Using a jigsaw cut out the aperture. Take a small round file and remove all the sharp edges then give them a lick of primer. Add your U-channel window rubber (also supplied with the kit).
Next you need to apply primer to the van and the glass ready for you to add the window bonding in a neat bead around the window. Put your panoramic window in place and press tight onto the van.
Finally tape it into position. Add more window bonding on the front face to stop wind and create a nice seam.
ELECTRICS
We installed LED lighting in the rear. As well as USB charging points. We drew power from the starter battery installing a relay to ensure the lights will turn off when the engine isn’t on. We also installed a cut off switch in the drivers cab.
We added some LED strip light below the roof windows, to create an upwards mood light. We added a light switch for this in the back. However it also goes through the relay in the front.

HEATED SEATS
We installed brand new sport heated seats in the Defender for additional comfort and style. To do this we removed the old seats, and separated the sliding rails from the bases and refitted them. We removed the floors rubbers and fit the wiring for the new heated seat buttons which will go on the dash. We used OE Land Rover switches and utilised two of the button blanks.

IROKO FLOORING
We wanted a floor that looked like boat decking to add a bit of warmth and luxury to the Land Rover interior. We ordered Iroko directly from the saw mill cut into planks. Started by cutting the exterior frame with 45 degree angled mitred corners. Then we fitted the L track. For the interior boards we used a biscuit jointer to mount the boards together and to the frame itself.
Once this was all set it was sanded down. Then we cut the grooves which we then filled with black polyurethane sealant to add grip. It was then sanded down for the final time. Finally we finished it with teak floor oil to create a durable water resistant finish.
We like the L-track cargo tie down system for a variety of different uses. You can use ratchets straps to secure your cargo in the rear. Great for anything heavy you want to put in the back you don't want to slide around.

HERITAGE LAND ROVER DEFENDER
We wanted to create a Defender that looked amazing in the town but can also handle itself off road. Everything we have done is durable and waterproof. We love working with Landrover Defenders and can't wait to get our hands on the next one. Keep your eyes peeled. Read our guide for more information on our Land Rover Defender restoration services, including Land Rover Defender Campers.
Get in touch with our talented team to discuss your own Land Rover Defender restoration.


