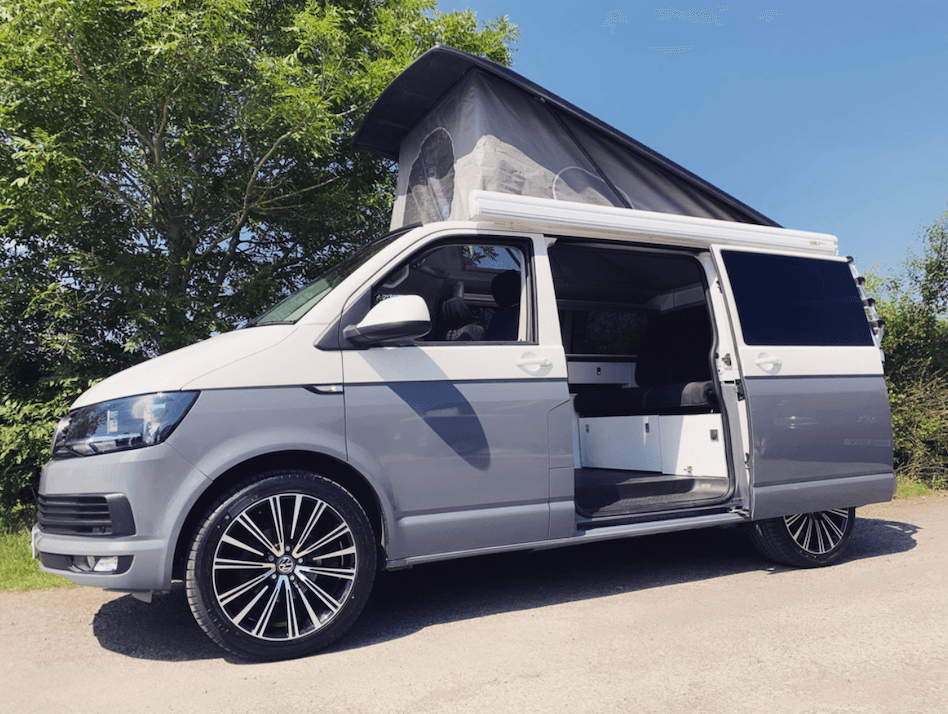
This guide will walk you through what to look for in a two-tone campervan.
Interested in going two tone? Check out this video from our friends at Wraptor Customs. This insane two tone wrap was fitted to one of our VW T6 Campervan Conversions.
There’s loads to think about when you’re buying your first campervan:
- What Campervan to Buy
- Campervan Interior Design
- Campervan Exterior Design
- Costs and Budgeting
- Insurance, Registration and Taxation
- Buying a Campervan from a Dealer or Private Seller
- The Paperwork Process
We’re going to focus on exterior design, two tone campervans and what to look for. The two-tone campervans are also known as the two-colour campervans. These vans have a distinctive look and are very popular in the UK and across Europe. They hold their value really well as they are often in high demand. A quality two-tone campervan conversion should sell very quickly.

Two Tone Campervan - A History
The two-tone paint job is when you have two different colours on the top and the bottom. The colour combinations are usually in contrast with each other, but there are no strict rules for how to do this.
The VW Campervan is one of the most iconic vehicles of all time. It has had many different iterations and styles over the years. The original design for a camper became popular among hippies in the 1960s. They are often equipped with a kitchen, bathroom, and sleeping areas.
The first VW Transporter was produced on 8th March 1950. In the past 70 years, more than 13 million vans have been built. Over the years that followed the van was adopted as a symbol of bohemian hippies who want to explore the world.
It was back in the 60s that you can trace the routes of the two tone paint job on the Volkswagen Transporter.
The two-tone look lost popularity during the 80s and 90s. However it’s back with a vengeance. A really great way to make your campervan totally unique and stand out from the crowd.

Cost of a Two Tone Campervan
The cost of painting varies a lot between different locations and body shops. The most expensive is metallic paint, followed by pearl, then matte. You’ll often find different body shops will have a colour they prefer to work with.
As a very rough guide the cost of having the bottom half your camper sprayed in a non metallic colour will be between £3,000 and £5,000.
The top half of the van can be cheaper to spray. The price does vary up and down the country. It’s worth shopping around between body shops.
If you’re open minded on the colour you want your van sprayed, mention this to your body shop. You might find certain colours will be cheaper than others. Usually non metallic whites come in at the most affordable price.
Things to look for when turning your camper Two Tone
A good paint job can make your van look amazing, but it is important to know what you are looking for when you go shopping for a new paint job for your vehicle.
- Find a reputable and reliable body shop that specialises in campervans. Most body shops will have done something like this before. Ask to see pictures of their work.
- Check for their reviews on the internet to see what other customers have said about them.
- The body shop should be able to offer you a warranty for the work they do on your campervan, this will ensure that the work is of high quality and can be trusted for years to come.
- Keep in mind that it may take up to a month for your campervan to be ready, so plan ahead and make sure you have enough time before you need it back from the body shop! Don’t plan a campervan holiday around that time, incase of delays.
If you’re planning on purchasing a campervan that has already been two-toned, then you need to check a few things when you go to view. Open the passenger and driver door and check to see how new paint has met with the old paint.
A good paint job should have sharp lines, you shouldn’t be able to see where the paint has met. A bad paint job will have overspray and the new colour will fade into the old colour.
If you open the doors and don’t see anything, then that’s a good paint job. You will know a bad job when you see it.
On the rest of the bodywork look out for an ‘orange peel’ effect. The paint finish should be smooth and mirror-like. Bad paint jobs will often look bumpy like the peel of an orange. This can sometimes show up all over or just in patches.
Body shops are definitely in the ‘you get what you pay for’ category. I wouldn't rush to the cheapest option. Shop around and make sure you see some of their past work.
The worst case scenario with a bad paint job is chipping and flaking. This not only looks terrible but can also lead to rust. We’ve seen this happen on vans that have only just come out of the body shop.
If a painter tells you not to use a jet wash on the van after it’s been painted, I would turn around and walk the other way.

Two Tone Wrap for your Campervan
An alternative to painting your campervan is using a vehicle wrap.
A vehicle wrap is the process of applying a vinyl decal, film, or graphic design to the exterior of your van. The most popular wrap designs are those that are large enough to cover the whole camper, but there are also options for smaller designs that can only cover part of the vehicle.
The wrap is applied to the exterior of the vehicle and can be either installed on a new or used van. A vinyl decal is a thin film that is attached to your existing car with adhesive. Vinyl decals are available in different colours, sizes, and designs. A graphic designer can help you create a custom design. Alternatively you can use a solid colour to create a two-tone look.
These vary in price but you would be looking at around £2,500 for a half wrap of a VW Transporter.
The pro’s are that they can be cheaper than a respray. They are also not permanent, you can peel the wrap off when you get bored. A company will charge around £400 for removing the wrap, but you can do it yourself with a heat gun and patience. The wrap should protect the paint work underneath from stone chips and small scrapes.
The negatives are that it will begin to peel after a few years and you shouldn’t really use jet washes or automatic car washes on the vehicle once the wrap is fitted. They can look pretty shoddy once they start to peel.
Wraps can look great from far away. They will never look as good as paint when you get close up. The corners and crevices will still show the original colour.
I would also only fit a wrap to a van with factory paint. If you have ever had any repairs done to the bodywork, the paint is likely to peel when you remove the wrap. Something to think about with older vans. Or a van that you’re not sure of its history.
The biggest benefit of a wrap vs paint is you can choose from some pretty wild colour choices! Think neon mirror or copper metallic. You can achieve a vibe that would be impossible with paint.
If you have accessories on your campervan like awnings, solar panel kits or bike racks think about the colour scheme. For example, you might want to go with all black accessories or all white.

Two Tone VW California
Laid-back and spacious, the VW California is a luxury camper that’s made by Volkswagen themselves. The van has two rows of seats and a basic kitchen with cooker and fridge. It has a wealth of technology and a powerful diesel engine. The VW California offers a factory two tone paint job as part of the build.
A brand new California will set you back between £80,000 - £100,000. It's easy to see why people want to replicate the California feel, without the hefty price tag!
VW Van colour
If you know you want a two tone van and haven’t bought the van yet, it pays to think ahead. Many of our customers will order a white van with the intention of having half of the van painted or wrapped. This can save money on upgraded colour costs.
If you’re buying a second hand van, the plain white Transporters can be cheaper than other, more popular colours. Keep in mind what colour you want to use for your two-tone so you know the original van colour will match this.
It’s also good to keep in mind what colour the interior of your van is. This will make the full van feel coherent when it’s finished. I’ve seen some seriously hodgepodge vans over the years!

Wildworx Two Tone Campervan
We’ve been involved in countless two tone campervan projects over the years. It’s a really great way to give your Campervan Conversion a totally unique look. Make sure you get expert help and visit a few body shops before you commit.
We have our own body shop which specialises in two-tone campervan paint jobs. Our workshop is located in Alcester, (near Stratford Upon Avon) Warwickshire. Get in touch for more information.


